
BR⚡LN Guide
Lightning lab: practise with three nodes without risking a single satoshi
Before putting real sats into a node, you can practise everything in a lab: three Lightning nodes talking to each other, with coins that are worth nothing. This guide shows how to install it and walks you through each operation, with real LightningOS screens.
What the regtest lab is
Regtest is a Bitcoin blockchain that runs only on your computer. It works like the real one, with addresses, transactions, blocks and Lightning channels, but the coins are worth nothing and nobody from outside takes part. It is the right place to make mistakes: open a channel, close it, pay, rebalance and see what happens, without risking a satoshi.
The LightningOS lab installer sets everything up by itself: Bitcoin Core 31.2, three LND nodes called Alice, Bob and Charlie, and a LightningOS panel for each. It also funds the three wallets and opens a triangle of channels: Alice → Bob → Charlie → Alice, three channels of 1,000,000 sats with half the balance on each side. That is enough to pay from one node to another, go through a node in the middle and test a circular rebalance.
A lab is not a node. Nothing that happens here reaches the real network: wallets, channels and balances do not move to production. For a mainnet node you do a separate install, on a computer dedicated to it. Never install the lab on a node with real funds, and never import a real wallet into it.
The screenshots below were taken with the panel in Portuguese. The text gives the names you will see in English.
What you need
- A fresh Ubuntu 24.04 (amd64) used only for the lab: a virtual machine (VirtualBox, VMware, Proxmox) or the Ubuntu built into Windows 11 through WSL2.
- 4 GiB of memory and 20 GiB free on the Linux disk, with
systemdenabled. - Internet during the install, to download packages and build LightningOS.
1. Install it with one command
On an Ubuntu VM, give the machine the name the installer expects and run the bootstrap:
sudo hostnamectl set-hostname los-regtest
sudo apt-get update
sudo apt-get install -y ca-certificates curl
curl --proto '=https' --tlsv1.2 -fsSL https://raw.githubusercontent.com/jvxis/brln-os-light/agent/0.5.50-release/lo_regtest_bootstrap.sh | sudo bash -s -- --disposable-host
The bootstrap downloads a clean copy of the code, runs install_regtest.sh and deletes only the temporary copy at the end. The install takes a few minutes, because it builds LightningOS. Running it again resets nothing: the lab's wallets, channels and passwords are kept.
The installer refuses machines that already have a node: if it finds LND data or production services, it stops. That is on purpose.
On Windows 11, with WSL2
Without a VM, you can use the Ubuntu built into Windows. Set aside a distribution just for the lab:
- In PowerShell, install it:
wsl --install -d Ubuntu-24.04. Check withwsl --list --verbosethat the version is 2. - Inside Ubuntu, open the configuration file with
sudo nano /etc/wsl.confand add:[boot] systemd=true [network] hostname=los-regtest - Close the Ubuntu terminals and, in PowerShell, restart only that distribution:
wsl --terminate Ubuntu-24.04and thenwsl -d Ubuntu-24.04. - Check:
ps -p 1 -o comm=should answersystemd, andhostnameshould answerlos-regtest. Then run theapt-getandcurlcommands above.
Keep the lab on the Linux disk, outside /mnt/c, and leave WSL open while you use it: when it is closed, the nodes stop.
2. Open the three panels
On WSL2, the panels open straight in the Windows browser: https://alice.localhost:8443, https://bob.localhost:8543 and https://charlie.localhost:8643.
On a VM, the panels only listen inside it. From your computer, open an SSH tunnel and leave that terminal open (on Windows, PowerShell already has ssh):
ssh -N -L 127.0.0.1:19043:127.0.0.1:8443 -L 127.0.0.1:19053:127.0.0.1:8543 -L 127.0.0.1:19063:127.0.0.1:8643 user@vm-ipThen open https://alice.localhost:19043, https://bob.localhost:19053 and https://charlie.localhost:19063. The different names keep the browser from mixing up the three logins.
The panels use the lab's own certificate. For the browser to trust it, copy the lab's public authority (scp user@vm-ip:/etc/los-regtest/ca.crt .) and import the file into the authorities of the browser you use for testing. In Firefox: Settings › Privacy & Security › View Certificates › Authorities › Import.
Each panel's password is on the VM. To see Alice's (change the node name for the others):
sudo cat /etc/los-regtest/alice/ui-password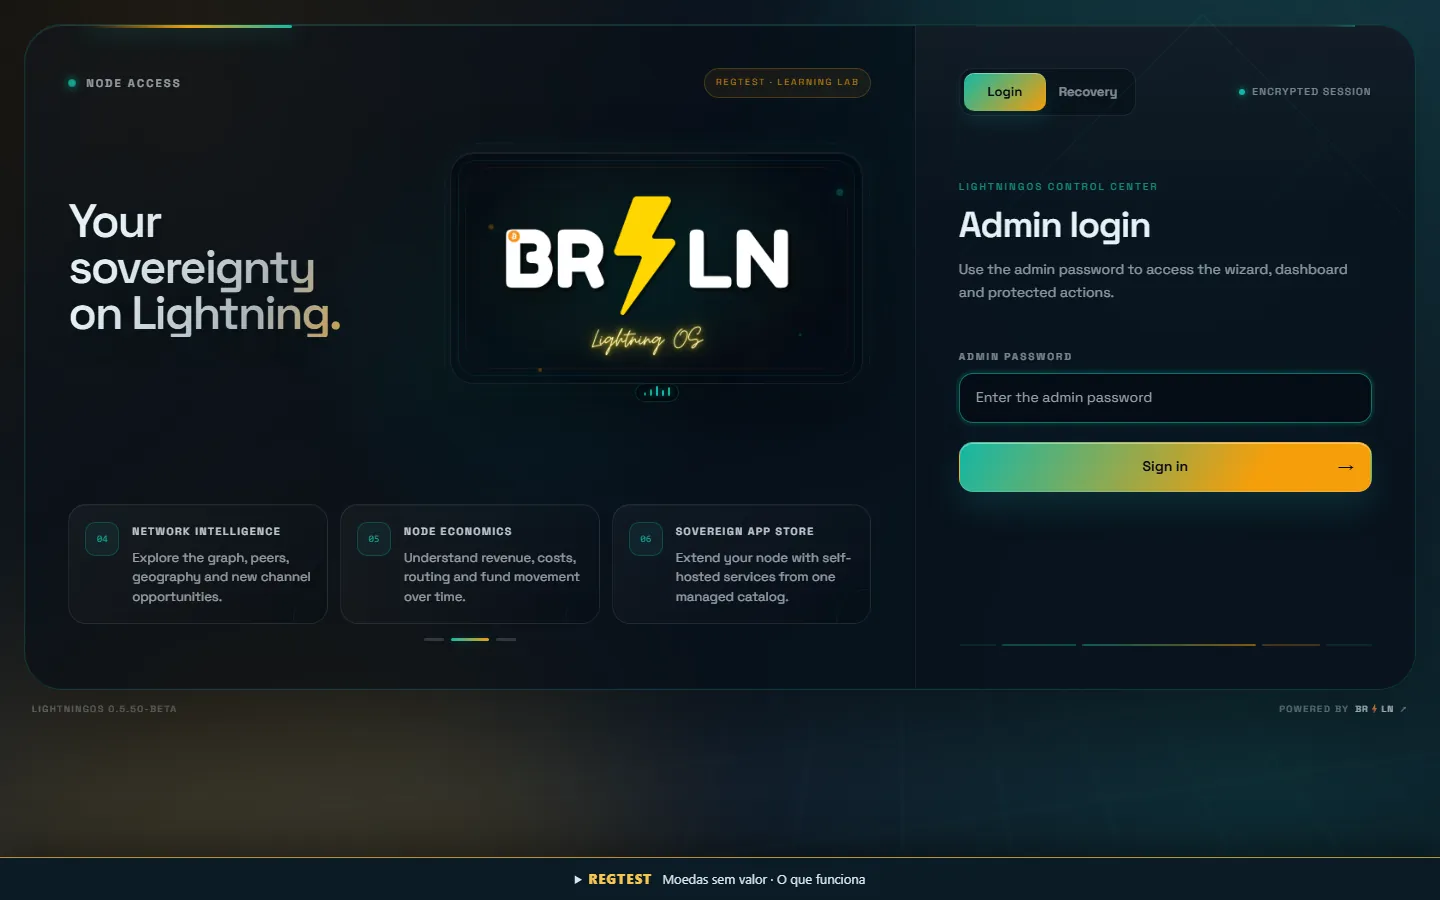
3. Get to know the panel
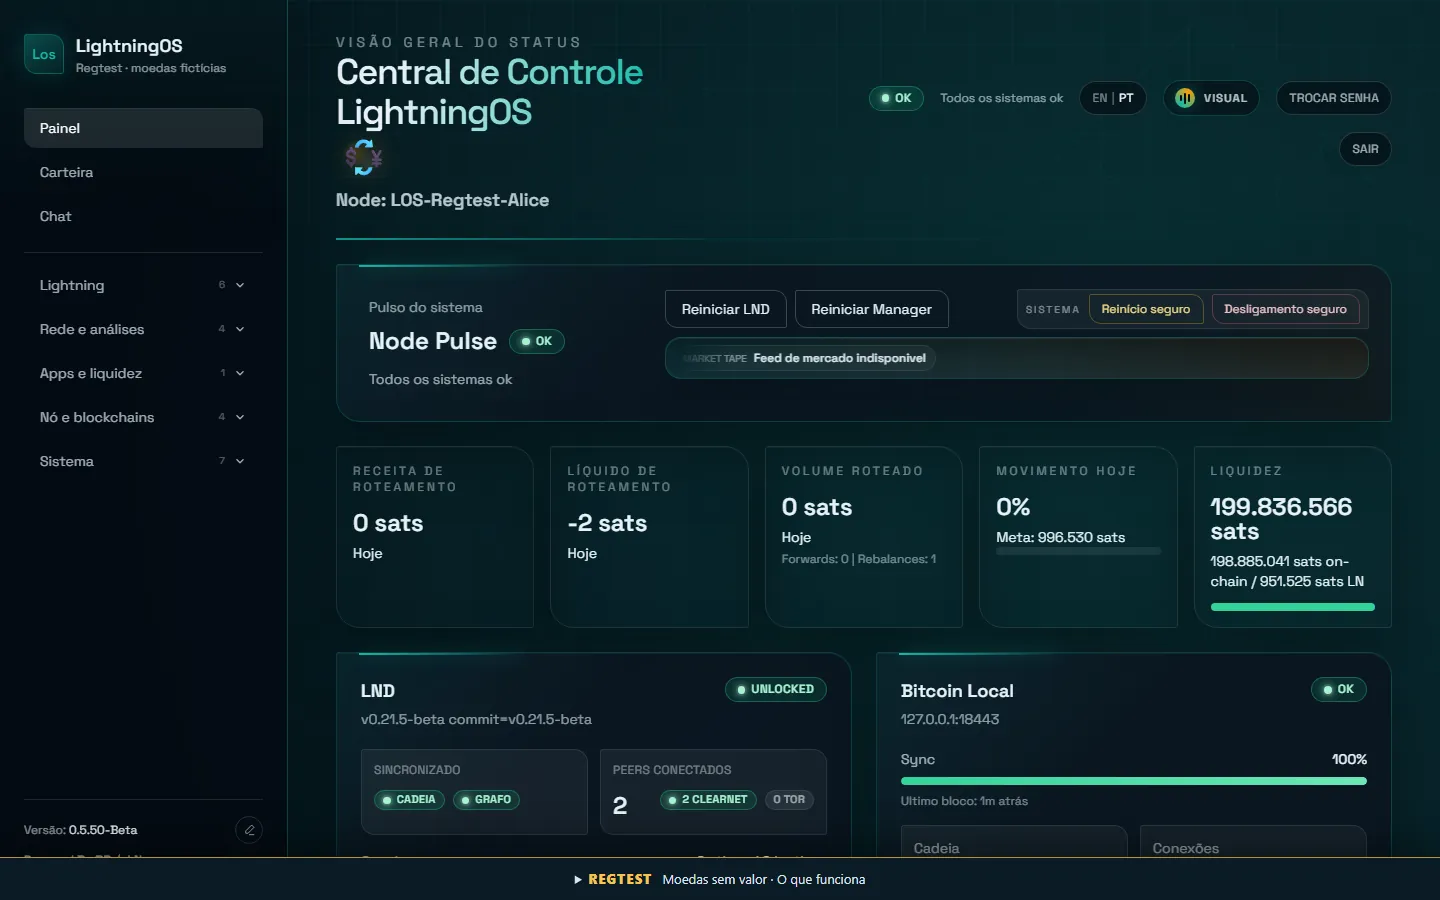
Log in as Alice. The language switch is at the top. The panel is the same as production LightningOS: menus on the left; in the middle, Node Pulse, the routing numbers and liquidity; below, the LND and Bitcoin cards.
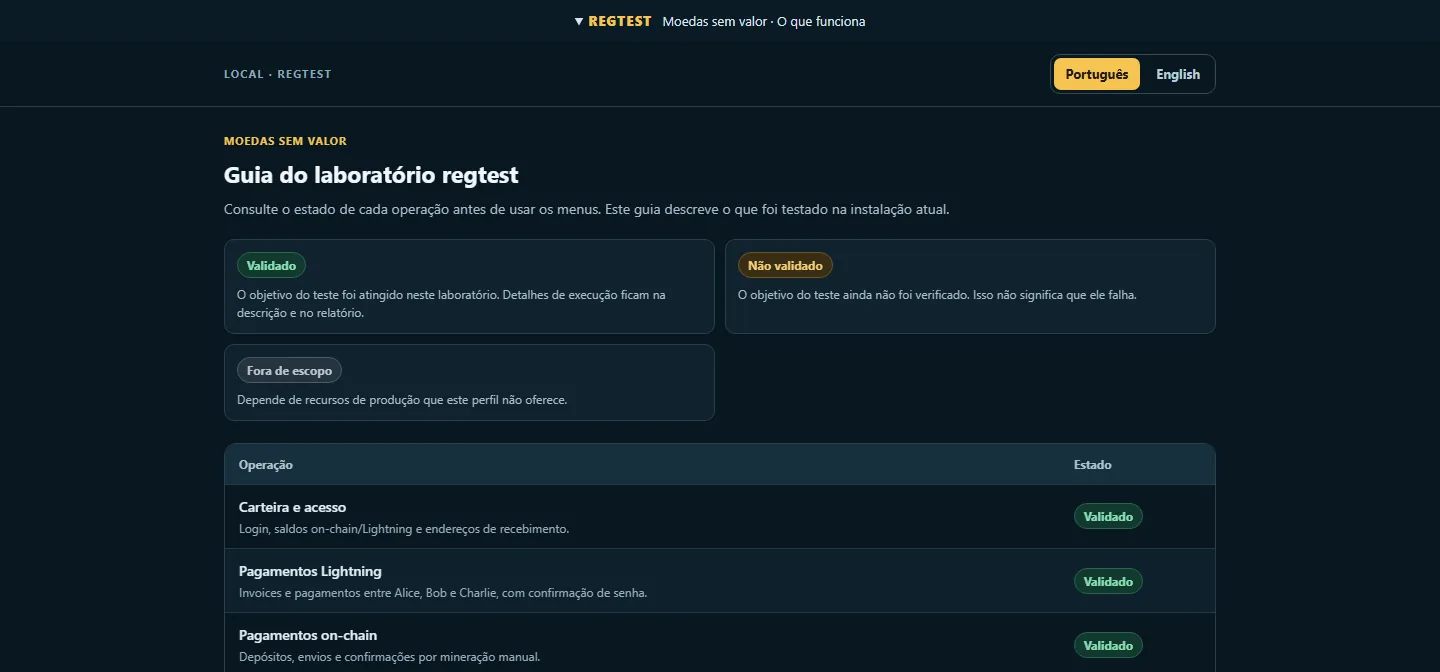
Click the REGTEST strip at the bottom (Coins have no value · Supported features). It opens the Regtest laboratory guide, with the status of each operation: Validated (tested and working here), Not validated (not tested yet, which does not mean it fails) and Not supported (depends on things that only exist in production). Check it before using a menu.
4. Blocks: the lab's clock
On the real network, miners around the world make a block every 10 minutes on average. Without a block, nothing that goes on the blockchain confirms: deposits wait, channels stay pending and closes do not finish. In the lab, the installer turns on an automatic miner that makes a block every 60 seconds, with worthless coins. You do not need to do anything: after sending a transaction, just wait a few minutes. Six confirmations, enough for every exercise in this guide, take about 6 minutes.
To check the miner and the three nodes, run on the VM (or in the WSL Ubuntu):
sudo python3 /opt/los-regtest/automine.py status
sudo python3 /opt/los-regtest/control.py status
If you want to control the block height, or do not want to wait, pause the miner and mine by hand. The interval can also change, from 10 to 3600 seconds, and the choice survives restarts and reinstalls:
sudo python3 /opt/los-regtest/automine.py pause
sudo python3 /opt/los-regtest/control.py mine 6
sudo python3 /opt/los-regtest/automine.py resume
sudo python3 /opt/los-regtest/automine.py interval 30
The miner only works while the machine is on and does not make up for time off. If the VM was off or the miner was paused for a long time, LND thinks it lost sync (Chain turns yellow on the panel): wait for the next block, or mine 1 with control.py mine 1, and only test once it is green again.
Lightning payments through channels that are already open do not need a block: they move inside the channels, without touching the blockchain. That is exactly the point of Lightning, and the lab makes it visible.
5. The wallet
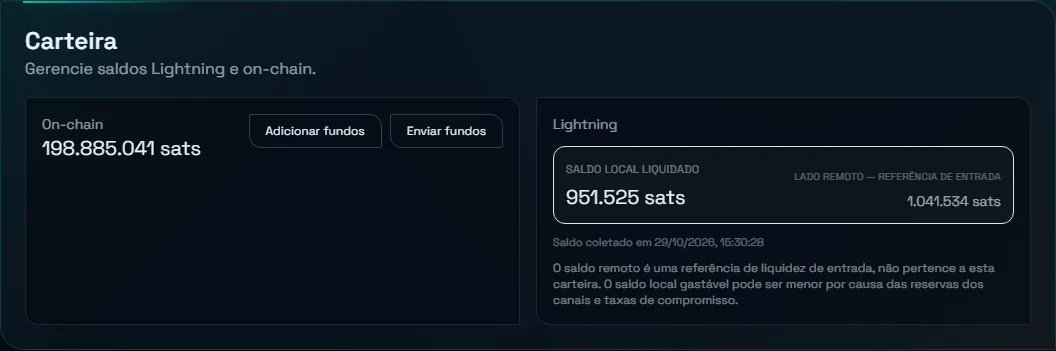
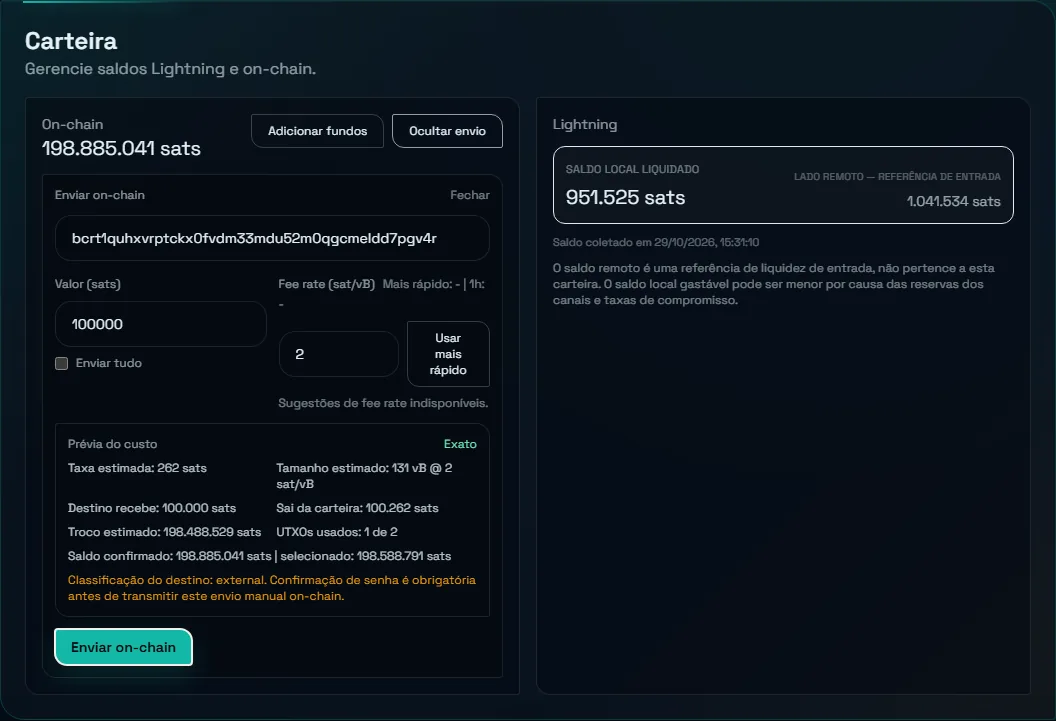
Open Wallet. The On-chain card shows the sats on the blockchain (the installer leaves almost 2 fictitious BTC on each node) and the Lightning card shows the balance inside the channels: the local balance is what you can send; the remote side is the room you have to receive.
6. Exercise: the first Lightning payment
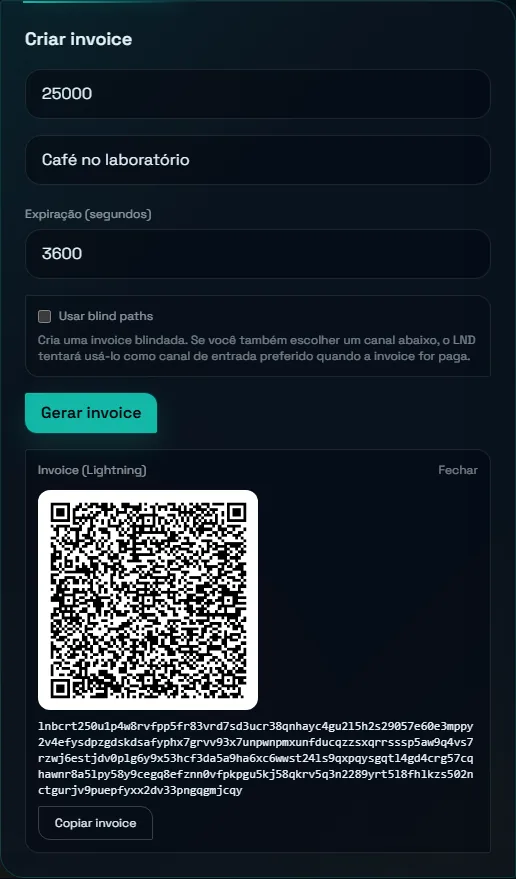
- On Bob's panel, under Wallet › Create invoice, enter the amount (25000) and a memo, and click Generate invoice. The QR code and the invoice text appear; the text starts with
lnbcrt(the rt is for regtest). Click Copy invoice. - On Alice's panel, under Wallet › Pay invoice, paste the invoice. The panel shows the amount and the memo. Click Pay invoice.
- LightningOS asks for the admin password before moving money, showing the destination, the amount and the fee limit. Check it, type the password and click Confirm this operation.
lnbc.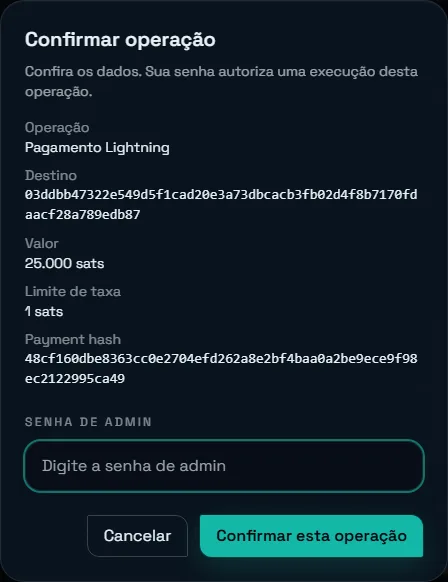
Done: in seconds, the 25,000 sats leave Alice's local balance and land in Bob's, with no block. Bob's Recent activity shows the invoice as SETTLED, with the memo and the node that paid.
7. Exercise: pay through another node
Lightning is a network: a payment can cross nodes on the way. Alice has a direct channel with Charlie, but you can force the path through Bob:
- On Charlie's panel, create a 10000-sat invoice.
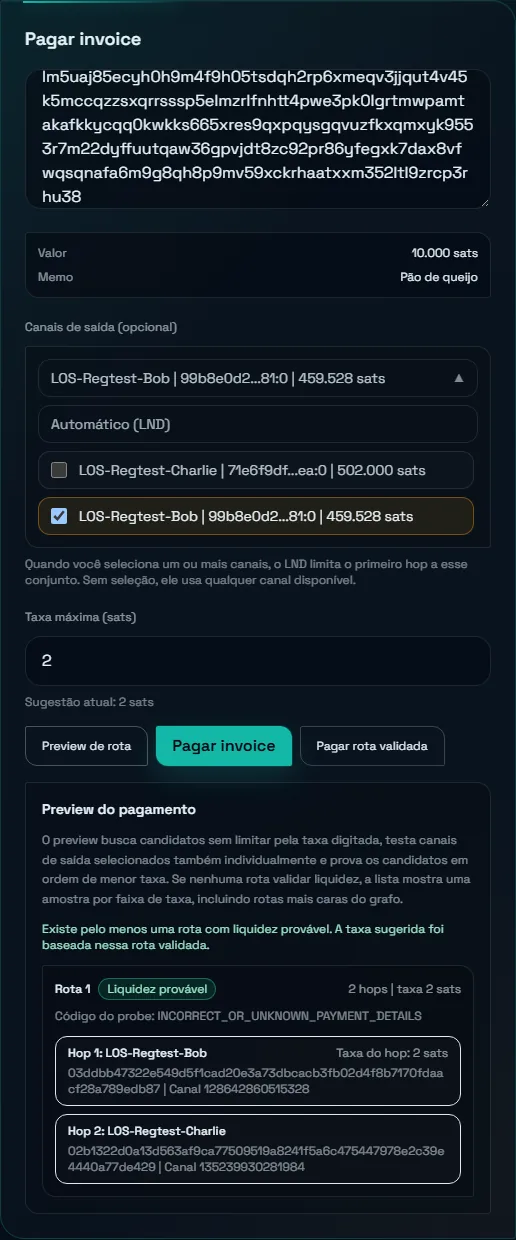
- On Alice, paste the invoice into Pay invoice, open Outgoing channels (optional) and tick only the channel with LOS-Regtest-Bob. That way the first hop has to be Bob.
- Click Route preview. The panel tests the path before paying and shows the route: 2 hops, Bob in the middle charging his fee, and Charlie at the end. The maximum fee is filled in with the suggestion.
- Click Pay invoice and confirm with the password.
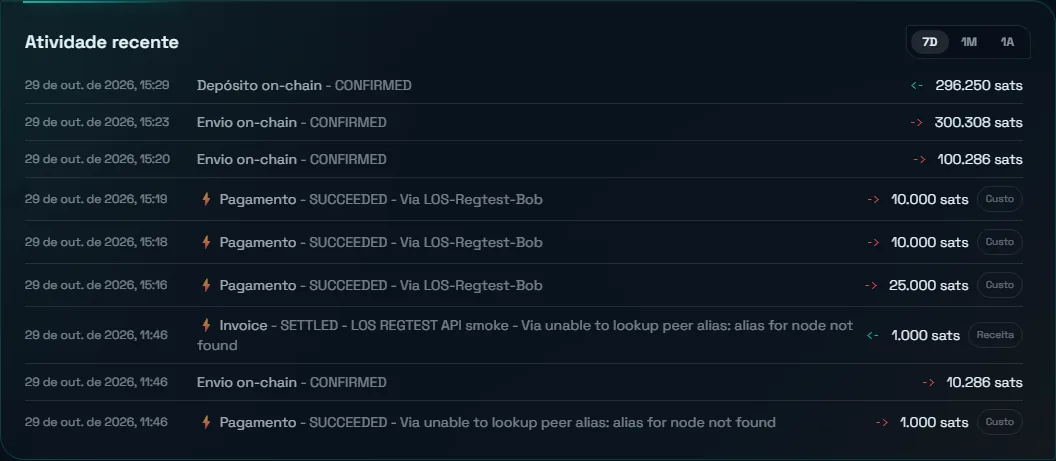
That is how a routing node earns fees: Bob forwarded the payment and kept 2 sats. The guide Lightning node fees in ppm explains how those fees are calculated.
8. Exercise: send and receive on-chain
- On Charlie's panel, under Wallet, click Add funds and copy the address (in regtest it starts with
bcrt1). - On Alice, click Send funds, paste the address, enter the amount (100000) and, under Fee rate (sat/vB), type 2. The lab has no fee history, so the automatic suggestion is unavailable: always use a manual rate. Check the Cost preview and click Send on-chain.
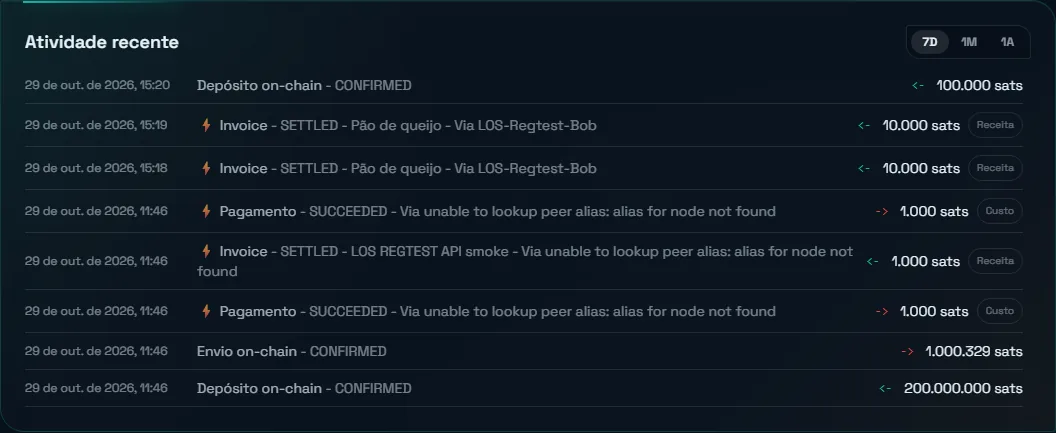
- Confirm with the password. The panel shows the Txid of the broadcast transaction.
- Nothing shows yet in Charlie's Recent activity: the transaction is waiting for a block. Wait about 6 minutes, the time the miner takes to make six blocks, and refresh Charlie's wallet.
9. Exercise: open a channel
Opening a channel is an on-chain transaction: the balance leaves the wallet and is locked in the channel. Let's open a second channel from Alice to Charlie, of 300,000 sats.
- On Alice, go to Lightning › Lightning Ops and, in the Peers box, click Open. Copy LOS-Regtest-Charlie's Pubkey.
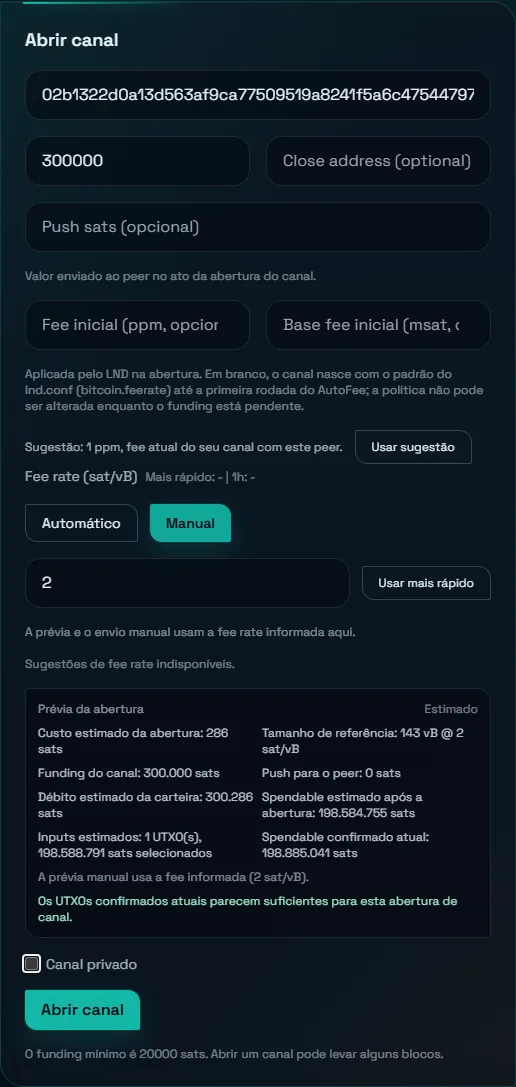
- In the Lightning Tools box, click Open channel. In the first field, paste the pubkey as
pubkey@127.0.0.1:9935(the node ports are 9735 for Alice, 9835 for Bob and 9935 for Charlie). - Under Funding amount, enter 300000. Under Fee rate, choose Manual and type 2. The Open preview shows how much will be left on-chain and whether there is enough confirmed balance.
- Click Open channel and confirm with the password.
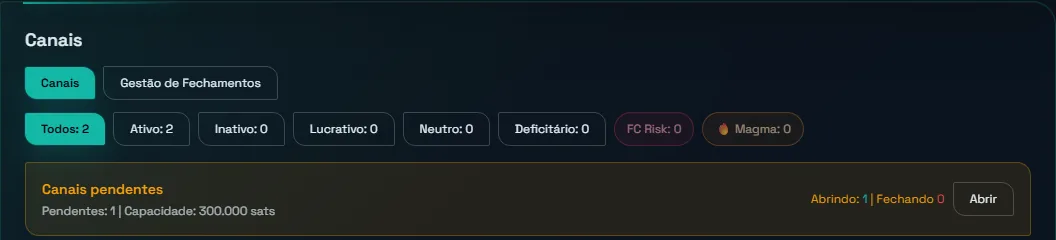
In the Channels box, the Pending channels strip appears. The channel only becomes active after the transaction confirms: wait a few minutes and click Refresh. The counter changes to 3 active channels.
Notice that the new channel starts with 100% of the balance on Alice's side: she can send through it, but cannot receive yet. The same happens with the first channel of a real node.
10. Exercise: set a channel's fees
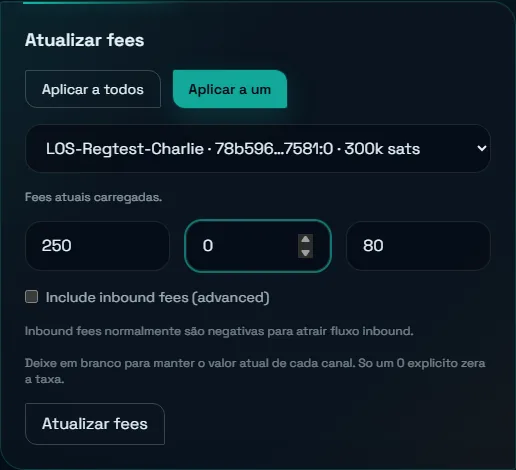
Under Lightning Ops › Update fees, click Apply to one, choose the new channel and fill in the fee in ppm (250) and the base fee (0). Click Update fees. The message Fees updated. confirms it, and the channel card now shows Out rate: 250 ppm.
11. Exercise: manual rebalance
The new channel has too much balance on Alice's side, and the channel with Bob has too little (45% local). A rebalance moves balance from one to the other by paying herself around the triangle: Alice → Charlie → Bob → Alice.
- Open Lightning › Rebalance Center and scroll down to the Channel Workbench.
- On the LOS-Regtest-Bob row, under Target outbound, enter 50. The panel calculates the Local liquidity to add.
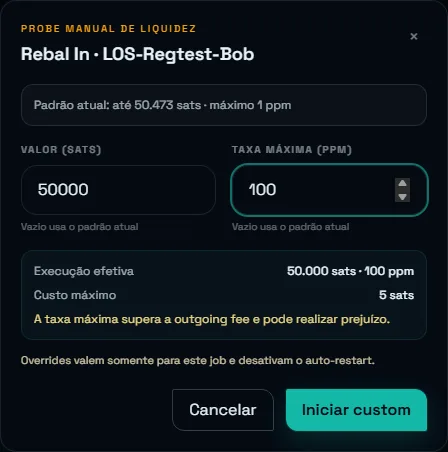
- The Rebal In button may be disabled. Just below it, the panel says why: the balance is already close to the target, or the default budget of 1 ppm (the channel's own fee) does not cover what the path charges. To run the test anyway, click the options button next to Rebal In to open the Manual liquidity probe. Enter the amount (50000) and a Maximum fee (ppm) of 100. The panel warns that the maximum fee is above the channel's and may lose money: in the lab, that is fine.
- Click Start custom and follow it under Recent History.
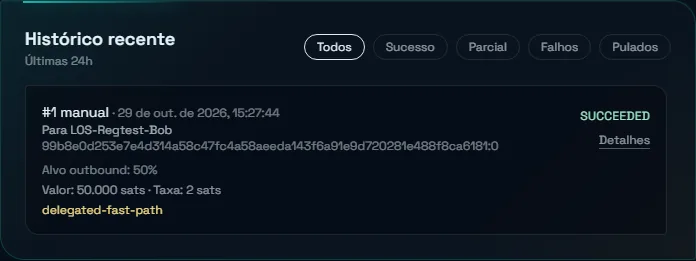
Under Lightning Ops, the card of the channel with Bob now shows the rebalance cost in ppm, a negative profit and the Deficit badge: it spent sats to balance itself and has not earned anything routing yet. In real life, a rebalance is only worth it when the channel earns more in fees than it cost to balance.
12. Exercise: close the channel
Under Lightning Ops › Close channel, choose the 300k channel with Charlie, select Manual and type 2 sat/vB. The Close preview shows the estimated cost and how much returns to the wallet. Leave Force close unticked: with the peer online, a cooperative close is cheaper and the money comes back quickly.
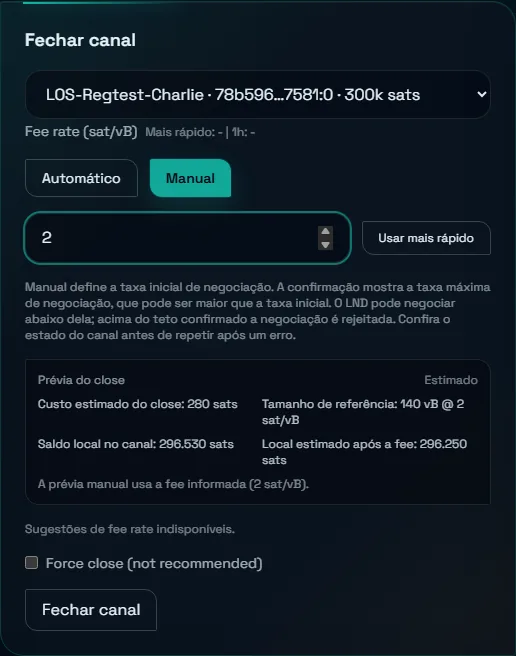
Click Close channel and confirm with the password. The confirmation window also shows the limit for the fee negotiation with the peer. Wait a few minutes: with the miner's blocks, the channel disappears from the list, the balance returns to Alice's On-chain and the Closure History records a Cooperative close.
If the peer proposes a fee above the limit you confirmed, LND rejects that round and the negotiation continues. Under Peers, the message stays as Peer error history, even after the channel closes: it is the last error LND received, not a current problem. Check the channel's state before repeating the close.
What else you can test
Also validated in the lab, and you can repeat them: batch channel opens (two peers in a single transaction), the balanced channel (Alice proposes, Bob accepts and the channel starts 50/50), the force close through maturity and the balance coming back, manual AutoFee (Dry run and Run now), Node Retirement, Succession, message signing and UTXO management. With a force close, the balance stays locked until the channel's maturity delay, which is over a hundred blocks. At one block a minute that takes more than two hours; to skip the wait, pause the miner, mine all at once with control.py mine 200, then run automine.py resume.
Not validated yet: scheduled automations, such as automatic rebalancing, self-repair and the HTLC Manager. Outside the lab: configuring LND from the interface (alias, colour, network), restarting and updating LND or LightningOS from the screen, the app store and external integrations. Those menus are still visible, but showing on screen does not mean they work here; some health panels also complain about production services the lab does not have.
From the lab to a real node
When the exercises feel easy, the next step is a mainnet node, with real sats. The way is in How to set up a Lightning node at home. Start small: what you practised here works the same there, but there every mistake costs sats.
Frequently asked questions
What is regtest?
A Bitcoin Core mode in which the blockchain runs only on your computer and blocks are created right there, with no outside miners. In the lab, an automatic miner makes one a minute. It works like real Bitcoin, but the coins are worth nothing and nobody from outside takes part.
Are the lab coins worth anything?
No. They are regtest coins that only exist on your machine. They cannot be sent to the real network or sold.
Why does my deposit or channel not confirm?
Because a block is still missing. The lab miner makes one a minute: wait a few minutes and refresh the panel. If it still does not confirm, check that it is running with sudo python3 /opt/los-regtest/automine.py status; if it is paused, turn it back on with automine.py resume or mine by hand with control.py mine 6.
Can I install the lab on my real node?
No. Use a VM or a WSL2 distribution just for it. The installer refuses to run where a node already exists, precisely so the two never get mixed up.
Can I run the lab on Windows?
Yes, with WSL2 on Windows 11, using a dedicated Ubuntu 24.04 distribution with systemd enabled. The panels open in the Windows browser at alice.localhost, bob.localhost and charlie.localhost.
What carries over from the lab to production?
Only what you learned. Lab wallets, channels and balances do not migrate: the real node is a separate LightningOS install, on a computer dedicated to it.